Time Machine & versions
Local Snapshots
Local snapshots of Time Machine is a feature of macOS that serves as a temporary backup solution, until your Mac has a chance to connect to its permanent Time Machine disk, such as Time Capsule.
In macOS High Sierra, Time Machine stores snapshots on every APFS-formatted, all-flash storage device in your Mac or directly connected to your Mac. In earlier macOS versions, Time Machine stores snapshots on the internal startup disk of your Mac notebook computer and any Mac OS Extended (HFS Plus)-formatted storage devices directly connected to that computer.
The snapshots can take up a significant amount of disk space (up to 80% of the disk), This peculiarity often causes confusion to users, because it appears like the System category is taking too much space on macOS High Sierra, in the About This Mac window.
On macOS High Sierra with APFS, the snapshots are located on your startup disk, but beyond any scannable area. DaisyDisk shows the snapshots as part of the purgeable space.
On older macOS versions, the local snapshots are located inside the restricted folder at `/.MobileBackups`. You can reveal its content by scanning as administrator. Note that DaisyDisk will still include the size of snapshots into the purgeable space.
It usually doesn’t make much sense to delete the snapshots, because just after you purge them, new snapshots will immediately begin to build up again. Instead, you can just let macOS take care of the snapshots automatically:
Snapshots older than 24 hours are automatically deleted. And to make sure that you have storage space when you need it, snapshots are stored only on disks that have plenty of free space. When storage space gets low, additional snapshots are deleted, starting with the oldest. That’s why Finder and Get Info windows don’t include local snapshots in their calculations of the storage space available on a disk.
However, in certain cases it may be desirable to forcedly delete the local snapshots. You can do it in DaisyDisk by dragging the purgeable space to the Collector, as you’d do with a normal file.
You can also use the command-line utility `tmutil` to manage the local snapshots manually.
Document Versions
Document versions is a related feature of macOS that keeps the history of revisions of documents that you create in certain applications. This history is stored in /.DocumentRevisions-V100 folder. If you delete this folder, you’ll not lose the documents, but all history of their editing may be lost. We generally don’t recommend deleting the document versions, unless you know what you’re doing.
Time Machine Volumes
A comprehensive Time Machine FAQ can be found here.
Even though DaisyDisk is able to scan Time Machine volumes, it does not allow you to remove any files from it. Apple does not welcome altering backups for a reason, and even in Finder you cannot make any modifications to your backups.
The only good way to delete anything from Time Machine backups without ruining them is using the Time Machine itself.
Never forget that by its nature the Time Machine will expand until it takes all space on its volume, so storing anything else on the same volume is not a good idea.
If you’re 100% sure you need to reduce Time Machine’s backup size by removing large files or folders from it, just follow the instruction below.
Scan the Time Machine volume. It usually takes 15 to 40 minutes depending on the way the disk is connected (USB, FireWire or Wi-Fi) and the number of stored backups.
Unless absolutely necessary, do not scan Time Machine volumes as administrator, because it will likely take 3 or 4 times longer.
By their nature Time Machine backups contain lots of hard links which greatly reduce the disk space taken by backups while making each snapshot a complete copy of your system. DaisyDisk only counts the first encountered hard links and thus gives you a more accurate picture of how large each snapshot actually is.
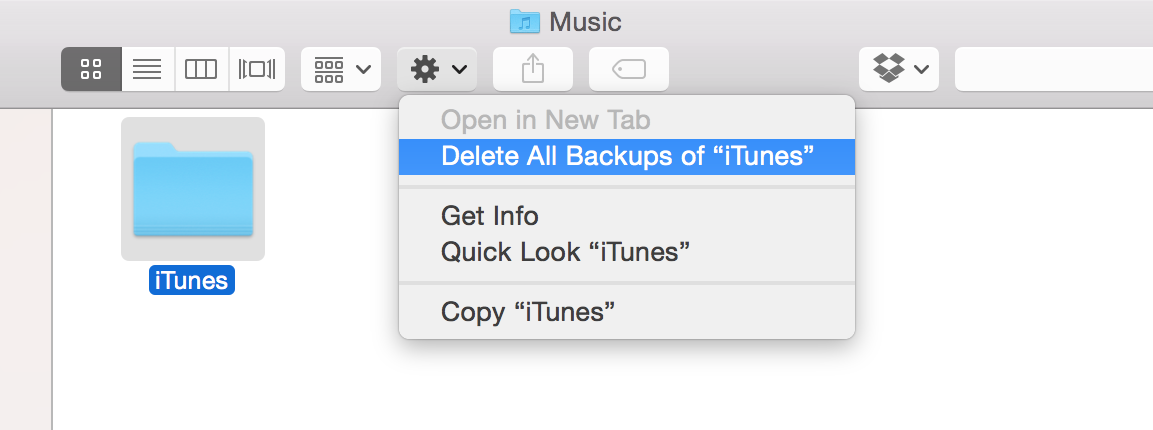
Once a candidate for exclusion from your backup is found, remember its name and backup date (backup folder names have YYYY-MM-DD-HHMMSS prefixes, e.g. 2011-10-15-141532), launch the Time Machine from your /Applications folder and browse to the date. With the regarded folder selected, choose the Delete All Backups of “Selected Folder” command from the menu:

That’s all. Don’t forget to configure the Time Machine to exclude the folders you don’t want to backup.